Let’s get started once again !
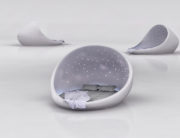
1) Table-top Water Garden
Materials Required
1)Glass container, Bowl or wide-mouth vase, 2) Water plants (e.g. Taro, water lettuce, water hyacinth, duck wee, fairly moss, etc), 3) Assorted Rocks, 4) Potting Soil, 5) Distilled Water, 6) Active Charcoal, 7) Plastic pots shorter than the height of your glass vessel, 8) mosquito fish (optional).
Note
Before setting up the composition, do note that this piece of plant ensemble can be quite hazardous when knocked over, so it’s wise to display it in alcoves or table-tops out of reach from children or pets. Another aspect is to place fish in the bowl to prevent mosquito breeding. If you feel that adding fish needs too much maintenance, an alternative can be to add a few drops of anti-mosquito solution into the water.
Assembling the Composition
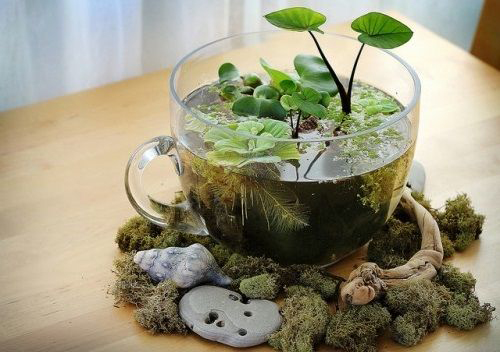
1)Dry your chosen display glass vase, making sure its clean. 2) Line the base of the vase with activated charcoal that has been rinsed with water to prevent it from colouring the water. 3) Place the pebbles over the charcoal. 4) Fill the vase with distilled water. Pour slowly to prevent the pebbles from being displaced. 5) Prepare a small plastic pot (smaller than your vase) with planting soil and place your desired plant type into the pot (e.g. taro). Once done, cover the surface soil with rocks or pebbles. 6) Place the potted taro you have prepared into the vase (nestle it snuggly into the pebble layer) and add any floating water plants like water lettuce. 7) Clean away any water left on the sides of the vase and remove any soil that has floated to the water surface.
2) Plant Container using Recycled Items at Home
Materials Required
1)Used hardcover books, wooden crates or other similar used items you can find at home, 2) Plant knife, 3) ruler, 4) potting soil, 5) small amounts of decorative moss or gravel, 6) small plants ( succulents, usually short and flat ones), 7) wax paper or plastic bag.
Note
Any recycled item can be used for this display piece, but for simple explanatory purposes, a used vintage hardcover book shall be used. Do bear in mind not to use plant types that can grow very quickly as it may out-grow the container easily and may turn out looking less than desired.
Assembling the Composition
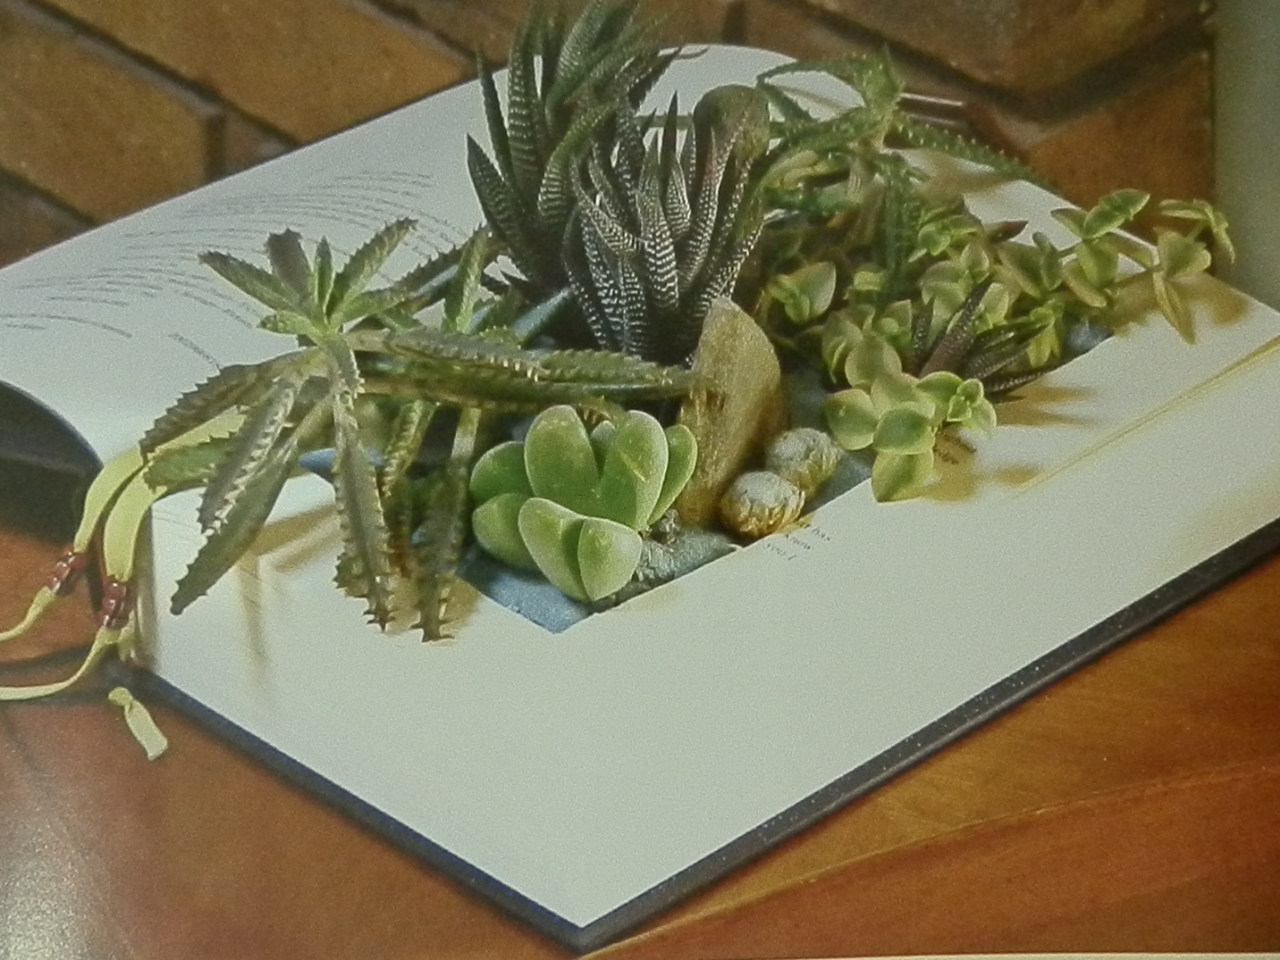
1) Decide and measure up the size of your planting hole to be cut out from the hardcover book (Title pages can be a good start and choose a page towards the front of the book to have that depth and also for the book to lay flat when planting starts. 2) Use the ruler to measure out a square or rectangle. Cut out the hole using the ruler and the planting knife (Use a sharp knife and cut a few pages at a time). 3) Continue cutting the pages until a depth of about 4-6 cm (1-2inch). Line the planting hole with wax paper or plastic (this is to keep the book undamaged when you water the plants). 4) Spread potting soil in the hole and carefully place the plants in the hole. Tamp the soil down and around the plants to keep them settled in. 5) Add moss and decorative pebbles around the top surface to cover the soil. 6) Water the plants with a few tablespoons each time (every 2 weeks). A dropper works like a charm for watering too. If a book is used, do use a thicker one so that the hole can be thicker to add a bit of gravel at the bottom for drainage.
3) Spring Flower Wine Boxes
Materials Required
1)Grit, stones or pebbles, 2) Wine box or wooden crates, 3) Bulb Fiber such as pet or coir, 3) Stems of willow, 4) Trowel, 5) Sphagnum moss, 3) Paper white narcissus bulbs or hyacinth bulbs.
Note
Its important to use “prepared” hyacinth bulbs or paper white “indoor” narcissus bulbs as these are used particularly for winter display. Other species of outdoor bulbs do not flower in time for Christmas.
Assembling the Composition
1)Prepare a firm and generous layer of grit on the bottom of the wine box or crate (this helps with the drainage). 2) Dampen the bulb fibre and add a thick layer on top of the grit, up to about 6-8cm (3inch) from the top of the box. 3) Place the bulbs in nicely spaced intervals. Take note not to place them too near or too far apart as they may turn out too dense and messy or too bare (nothing is worst than a sparsely filled display). Then add the willow stems in and around the bulbs to help accent the entire display. 4) Use the trowel to fill the remaining areas on the surface with fibre and decorate the top with sphagnum moss. 5) Place the display in a cool, dark place (ideally 9’C or 48’F), and water as and when required (do not water too much as this would make the bulbs go mouldy). 6) Check on the bulbs now and then and try to keep the fibre moist. 7) The first shoots of the paper whites should emerge 6-10 weeks later, and after 8-10 weeks for the hyacinths. Bring the box into the light to force the shoots into flowers. This should take about 3 more weeks.
4) Corker Plant Display
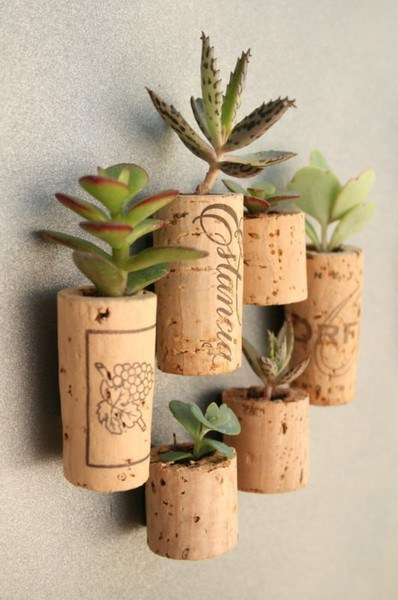
Materials Required
1)Various wine corks, 2) craft glue, 3) Drill bits (1/2″ or 1/4″), Small amounts of potting soil, 4) Tiny plant clippings (Succulents are perfect), 5) small amounts of decorative aquarium gravel, 6) small magnets (optional)
Note
This project is a delicate one as it involves small objects. Be careful not to drill too hard as it might drill through the cork piece. Larger items like compressed wood or planks can also be used, just use larger drill bits to create the planting holes.
Assembling the Composition
1) Dill carefully into the cork piece using a small drill bit. Enlarge the hole manually using a larger drill bit but avoid drilling all the way trough to the bottom. A 1″ (2-3cm) hole is perfect. 2) It is a nice idea to use craft glue to stick a piece of magnet at the bottom to make a fridge magnet, if not just display the corker plant display on table tops or window sills. 3) Add potting soil in the planting hole that you have drilled. Carefully place your plant clipping into the hole. Ad more soil if required and tamp down to secure the plant clipping. 4) Add a little aquarium gravel around to finish off your plant display.
Water the display with very small amounts of water ( 1-2 tablespoons shall be sufficient) every 7 to 10 days. A dropper works well to get water into the small openings. The plants will grow bigger and you might have to move it to a larger container eventually to encourage its growth.
5) Japanese Plant-Balls
Materials Required
1)Small plants like pothos, ferns, succulents or African violets, 2) potting soil, 3) bonsai soil (available online or at your nearest bonsai supply shop), 4) sheet moss, 5) twine (approximately 3 meters) optional.
Note
This composition showcases plants without their containers, bringing out their natural form and beauty. Do take care to ensure that all loose soil is attached to the plant roots firmly using sheet moss and use a saucer to avoid dirtying your display cabinets. If you intend to hang them, do take not of the height you hang it at and any soil that is still loose as they may fall onto the ground or onto unsuspecting guests.
Assembling the Composition
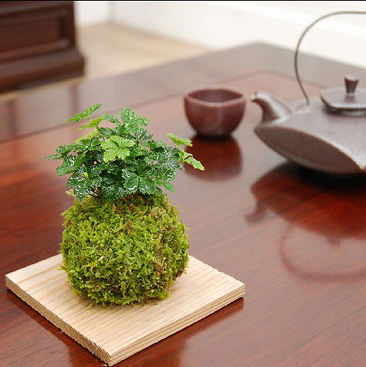
1) Mix the bonsai soil and potting soil equally in parts. 2) Remove the plant from its container and remove all the soil from around the roots. 3) Tamp the prepared soil mixture around the roots of the plant forming a ball or teardrop shape. 4) Carefully press sheet moss onto the surface of the soil ball. (This helps prevent soil from falling or losing its shape). 5) Hanging this composition requires you to wrap twine around the ball (estimate the length you wish to hang it from, usually 3m is sufficient), knot it and hang it from a hook in the ceiling. You can also set your moss ball in a saucer.
To water the moss ball, take it down from the hanger or remove it from the saucer. Soak it in water for about 2 minutes, allow it to drain and replace it in its display.
Hope you had a great time trying out these simple green projects. I know I had. Stay tuned for more simple, easy-to-do projects coming your way soon. See you’ll.


whoah this blog is magnificent i really like studying your posts. Stay up the good work! You know, many persons are searching around for this info, you can help them greatly.
Touche. Sounbd arguments. Keep up the good spirit.
Also visit my weblog – christmas gifs 2015
This post have resolved my problem,thank you very much and hope you writting more good articles.
Good, I like with your point of view